As some of you may have noticed when reading this blog, I was looking for an MTB as a new, additional bike for me.
And I initially put you and myself on the wrong track when I presented my 10 XC MTBs from which the new bike was to come. And I actually had the Orbea Alma or the Rose PDQ in my final selection. And then I changed my mind completely.
Table of content:
- Why a second bike?
- Who and what is Nordest?
- Setup Nordest Sardinha 2 Ti
- Conclusion Nordest Sardinha 2 Ti
Even though I really like carbon fibre and particularly appreciate the weight advantage, I still couldn’t bring myself to choose this material for the frame of my new bike. There were several reasons for this, including the fact that carbon is not yet fully recyclable and the concern about damage to the carbon structure, especially after I discovered a dent in the down tube of my Salsa Fargo Titan.
So I started the search again and ended up with two frame models, as I like to build my bikes myself: the Specialized Chisel made of aluminium and the Nordest Sardinha made of titanium.
Both convinced me with a weight of around 1,900g in frame size L. However, with my body measurements, I wasn’t quite sure which size to choose for the Chisel. I also liked the somewhat sportier geo and the many mounting points/eyelets of the Sardinha more, which is why I ended up with the Spanish frame.

Why a second bike?
I know: N+1 is considered good form in “our circles”. However, I’m not a fan of it and try to do everything on one bike. And that works very well, because the Salsa Fargo is a bike that can be used for a very wide range of purposes. It can be a sporty gravel bike or a good hardtail. However, its geo is very comfortable. I also like to call it the racing sofa.
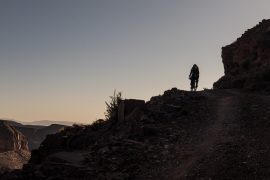
Now the Trans Balkan Race is coming up, a race where you are better off on an MTB (which also applies to many of the other big bikepacking races). I took this as an opportunity to build myself a new bike. It had to have a sportier geo than the Salsa Fargo and offer me more control and comfort off-road with a suspension fork and wider handlebars.
Who and what is Nordest?
I came across Nordest when I read one of the numerous “Rigs of…” articles on Bikepacking.com and saw a Nordest Sardinha. I was immediately attracted by the travel-friendly, long-distance geometry and the fact that there are enough eyelets to attach the necessary accessories.
Behind Nordest is a team of bike enthusiasts who have been building bikes for gravel and adventure in Spain since 2016 under the leadership of Pedro Jerónimo. Pedro Jerónimo is also known as a designer of titanium frames and has been building customised frames under the name Jerónimo Cycles since 2010.
Our journey began in 2016 with the founding of the NORDEST Cycles brand and the development of our first model. The identity of the brand is inspired by the wild region of “Tras-os-Montes” in north-east Portugal. Our head badge symbolises a “Careto”, a traditional element of the transmontane carnival. The north-east region is where Jerónimo’s family comes from. He is the ideologist of this project and in this way honours its origins.
Nordest
Officially registered in Madrid, Nordest develops and tests its bikes in the Canary Islands, where the climatic and geographical conditions are ideal for year-round testing.

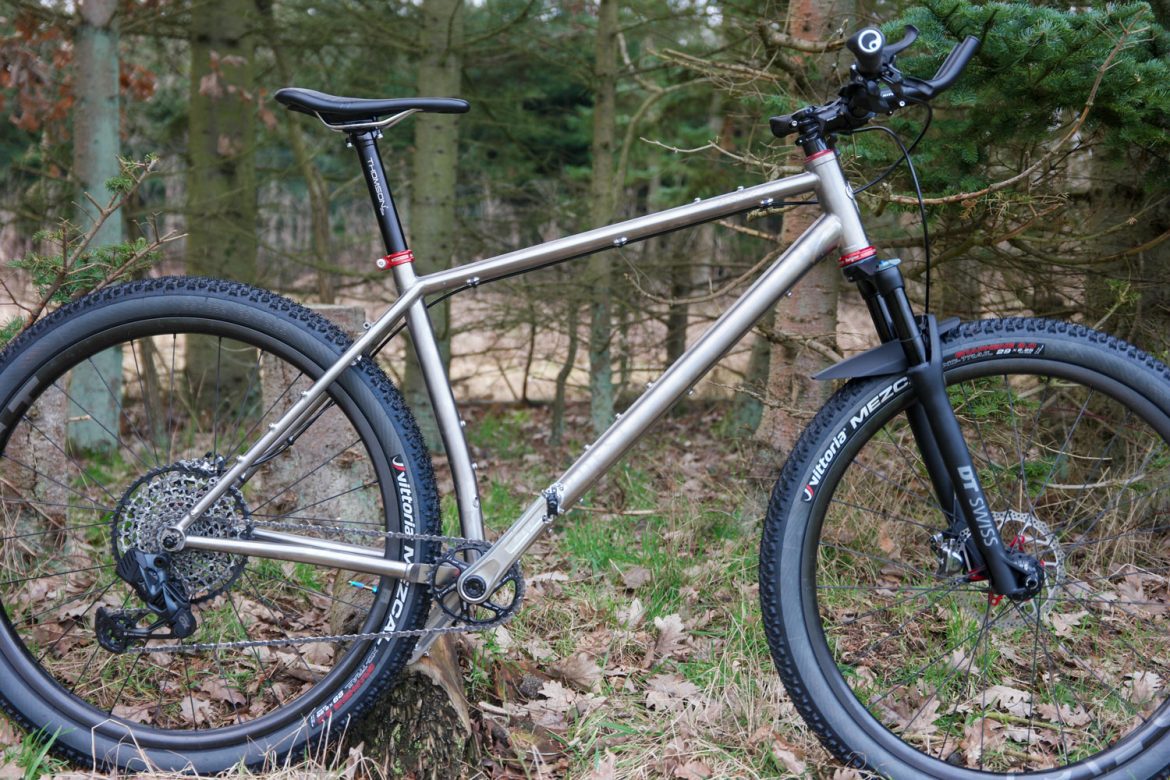
Setup Nordest Sardinha 2 Ti
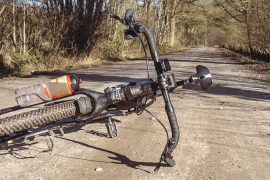
The frame
The Nordest Sardinha 2 frame is available in both steel and titanium versions. As I have had very good experiences with titanium, I decided in favour of this material again. The price of the frame without fork is 1,700 euros, which is ok for a titanium frame.
According to Nordest, the frames are made in Taiwan from CrMo 4130 steel and Ti3Al2.5V titanium. However, I have been informed that Nordest’s titanium frames are not built in Taiwan, but at Waltly in China. However, if you want complete bikes, the bikes are assembled in Spain.

With my height of 1.84m and a stride length of 80cm, I chose L for the frame size. I spoke briefly with Jerónimo beforehand, who clearly advised me to choose L and not M/L. And he was right, because the frame is ideal for me. The head angle of 67 degrees also fits very well. That’s 2 degrees less than the Fargo (69 degrees), which makes it sporty and comfortable. For comparison: modern XC MTBs like the Rose PDQ have a head tube angle of 67.5 degrees, or 69 degrees like the Canyon Exceed.
The Sardinha, PDG and Exceed are similar in the shortness of their chainstays at 430mm (for frame size L).
The seat angle of the Sardinha is slightly more inclined at 74 degrees, which is probably also due to the curved seat tube. For comparison: the Rose PDQ and the Canyon Exceed have a seat angle of 75 degrees.
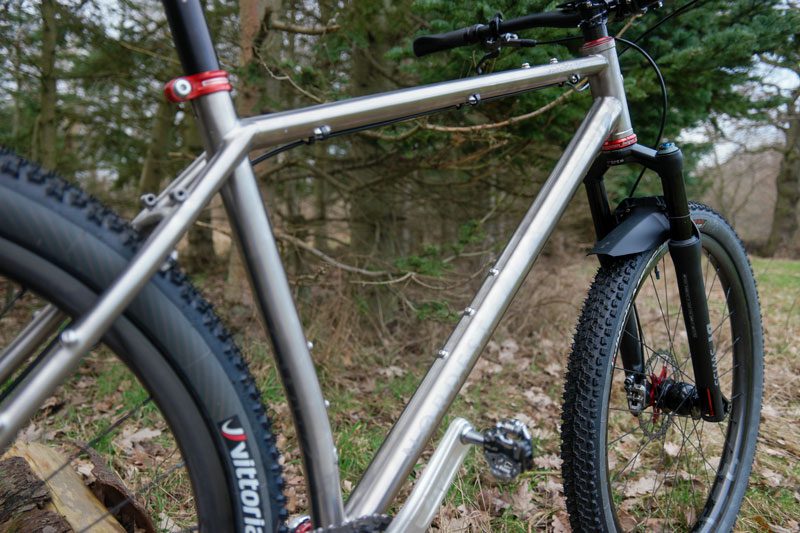
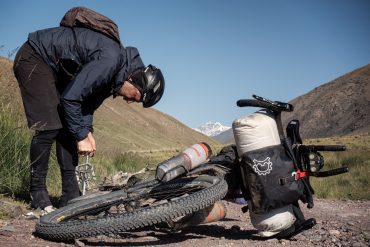
What I particularly like about the Sardinha frame is the rather large frame triangle, which was also a decisive factor in my choice. You can store a lot of stuff in an appropriate frame bag, which makes the Sardinha a good packhorse. I therefore had a customised frame bag made by 7Roads Bags in the Ukraine, which I will show you in detail later.
In terms of geo, I wanted a sporty frame. The Sardinha has a stack to reach ratio of 1:28, which is very sporty. The Specialized Chisel has a StR ratio of 1:36, the Orbea Alma a StR ratio of 1:37 and the Salsa Fargo 1:74!

The Sardinha frame looks quite long with its 661 or 669mm top tube length in size L. Unfortunately, Nordest give different geometry data for the top tube length on their Spanish and English websites.
I therefore measured my frame and here is the data:

In practice, however, the Sardinha is very agile and at the same time very comfortable. It was immediately very pleasant to ride. You can tell that it has long-distance genes and is designed for many days in the saddle and off-road. And even if you ride for longer, there are no aches or pains. It is simply a good and pleasant pedalling experience and you can put a lot of pressure on the pedals without the bike becoming unsteady.
I have installed a 70mm stem and 760mm wide handlebars. With my torso length and shoulder width, this is ideal for me to ride the bike quickly and safely through difficult terrain. This is where it really shows off its short (430mm) chainstays and provides the necessary agility.

The frame weighs 2,010g in size L with seat clamp and rear thru axle.
The frame (Boost) can accommodate plus wheels for extra traction and flotation: 27.5″ + up to 3.0″, 29″ and 29″ + up to 2.6″. For the fork, we suggest a rigid chromoly steel fork to match the frame, but you can also install a suspension fork with 100/120 mm travel. The Sardinha is prepared for mounting all kinds of racks, bags, saddlebags, mudguards and accessories you can imagine.
Nordest
A striking feature of the frame is the three eyelets on the dropouts. In principle, they are a good idea and you would think that you could attach an Anything Cage for small panniers or bottle cages there. Unfortunately, the short chainstays stand in the way of this, which is why the heel always comes up against the bottle cage or bag holder when pedalling.
That’s a shame, because the eyelets don’t make any sense. The best you can do is attach very narrow holders to carry tent poles, spokes or an air pump and gas cartridge.

I have tried a few holders here, for example the Ortlieb Fork Packs (too wide and high), the Blackburn Cages (too long and too wide) and normal bottle holders with 600 and 950ml bottles (too wide and too long). But I found a solution: using the Wolf Tooth B-RAD Bottle Shift, I moved the bottle cage more inwards towards the wheel and thus got the bottle away from the heel. With my tyre width of 2.25 inches, this is completely ok. I’m also thinking about screwing a holder for CO2 cartridges onto the other side of the Bottle Shift.

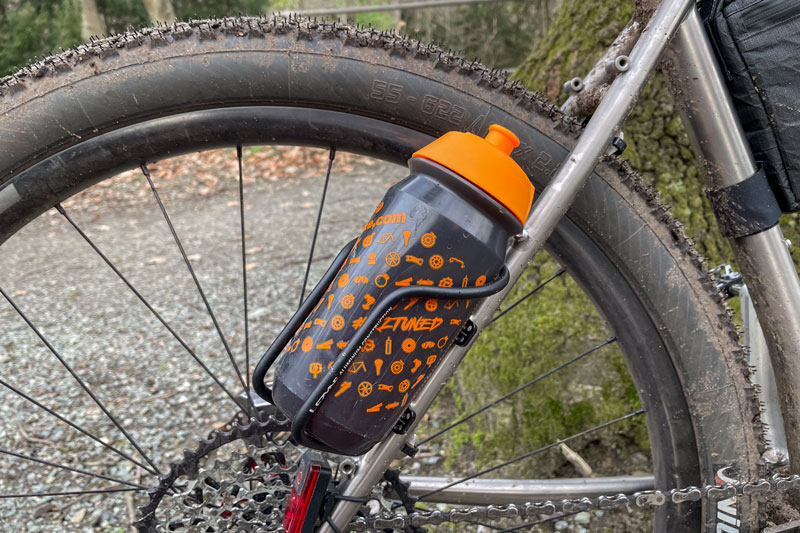
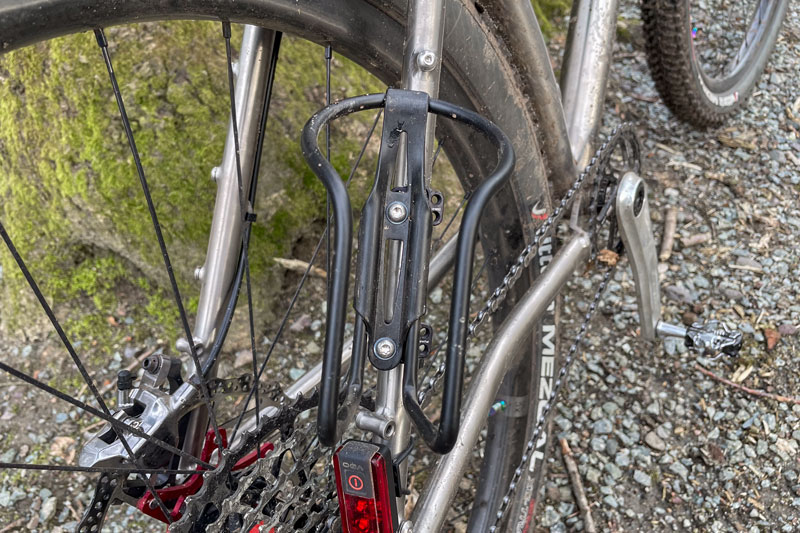
In any case, this extension means that the eyelets on the dropouts are not completely useless and I can move my bottles from the fork to the rear. Because this time the fork is a suspension fork.
The fork
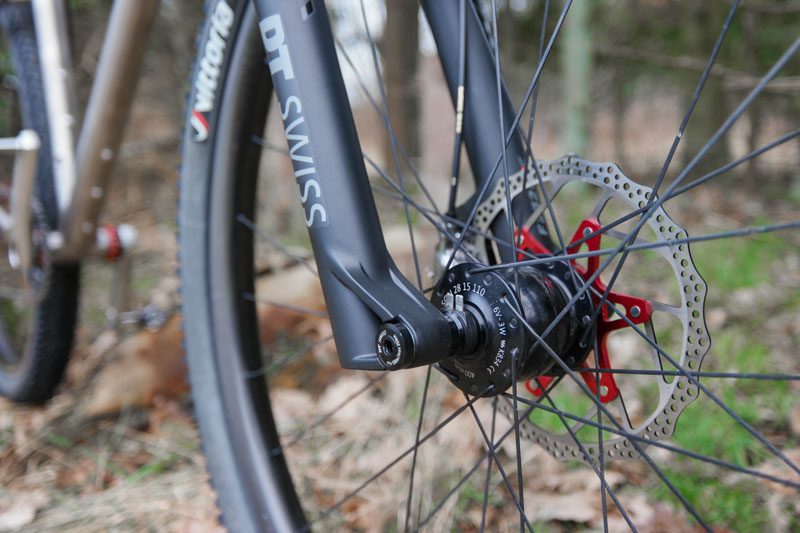
The Sardinha frame is designed for suspension forks (Boost) with a travel of 100 to 120mm. My frame was manufactured for a fork offset of 51mm. However, you can also get frames for a 44mm offset.
Through the MTB project, I also took a closer look at suspension forks. Originally I had my eye on a Rockshox SID SL Ultimate 3P. However, it is very expensive, even though it is very light. But it was important to me that the fork could be adjusted in 3 positions. In other words, the option to fully lock out the fork when riding on tarmac, to open up the fork when riding off-road or to switch the fork to an intermediate mode that takes light terrain well but doesn’t allow too much force to flow into the suspension. At Rockshox, this compression damping position is called “Pedal”.

The compression adjustment is controlled either via a switch on the fork crown, or electronically or manually via a switch/knob on the handlebars. I opted for control via the fork crown.
For the suspension travel I wanted 100mm. That’s quite enough for the XC riding I’m planning. And ideally, the fork should have the right amount of offset(51mm).
During this search, I came across the DT-Swiss F 232 ONE. It is specially developed for cross country and weighs just 1,480g with 100mm travel. And it has the desired compression settings of Open, Drive and Lock. The spring stiffness is set via compressed air and the rebound via a wheel at the bottom of the fork tube. Depending on your weight, you can easily see which values are required in a table and then adjust the fork accordingly.
The maximum system weight of the fork is 130kg. The maximum tyre width is specified as 73mm (2.8 inches).

The installation height of 507mm with 100mm travel is very suitable for my setup, so I didn’t have to shorten anything.
However, I have a question for suspension fork experts: the DT-Swiss user manual states that the fork requires maintenance every 200 hours and every 50 hours in “more extreme conditions”. Ideally by the DT-Swiss specialised service. Those are pretty short times, or am I being too critical? In my case, this theoretically means that I’ll need a service every 4-5 months, or directly after the Trans Balkan Race, as I’ll be travelling for more than 50 hours and it will probably be a bit more demanding. However, I also know that RockShox forks, for example, tend to break after such races.
So, do any of you know which service is meant and whether I can do it myself? I think it would be better…
The drivetrain
For the drivetrain, I opted for the tried and tested components from SRAM and once again decided in favour of a 12-speed SRAM Eagle GX AXS drivetrain. Originally I was sure that I wanted to install the new SRAM Transmission this time, but firstly the frame is not UDH-compatible and secondly I didn’t (yet) want to enter the “walled garden” of the new Transmission, where the components are no longer compatible with the previous SRAM products.
It would have been no problem for Nordest to build a Sardinha frame with a UDH derailleur hanger, but the waiting time was quite long and I wanted to ride the new frame extensively before the race. And if transmission becomes relevant for me again, I can buy a new frame.

So now the tried and tested electronic Eagle GX AXS drivetrain from SRAM. And if I didn’t say earlier that I wanted to avoid closed systems (walled gardens), then the AXS is in principle one such system. However, I have had very good experiences with it so far.
And – thinking ahead – if I go on a long tour with the Nordest, where electronic shifting might not be ideal, I can simply convert to mechanical shifting (SRAM XX1 and X01).
All I have to do is change the trigger and the shifter body and I can continue to use my 10-52 cassette.
And the same applies in the event of an (unlikely) breakdown on the road: if all else fails, I simply install a mechanical MTB drivetrain and I’m done.
However, I am still a firm fan of the electronic SRAM and have had no problems with it so far. I also can’t confirm the usual horror stories about broken derailleurs or permanently flat batteries. I once had an exchange about this on Instagram and quickly realised that the reservations were mainly based on hearsay and not on first-hand experience. But that’s often the case with new technologies.
However, it must also be said that mechanical shifting is no less good. And as I described above, I would probably opt for a mechanical version for long tours in more remote areas. Both versions have their justification, I just like the electronic version better in terms of handling and precision. But maybe that will change again.
Excursus: durability of cassette/chain
At the rear, I have a 10-52 SRAM XX1/X01 XG-1295 cassette with an X01 chain.
I have had very good experiences with the wear of SRAM components so far: my SRAM Eagle GX cassette with GX chain runs on the Salsa Fargo for more than 10,000 km and still shifts without any problems. I also ran this as a test, as SRAM promises longevity. My chain doesn’t get any oil, just Squirt Lube or ToniQ chain wax. This keeps it running well even in bad weather and it’s enough if I wax it every now and then.

However, I’m not the kind of person who regularly measures my chain and then replaces it. That’s why I used to simply shorten the chain depending on how worn it was until everything was finally broken. So I’m more of a practical person and I ride my bike until it falls apart. And that’s not the case at the moment. Quite the opposite: I was used to other cassettes/chains causing problems after around 1,000 kilometres when I fitted a new chain. By then, the rear sprockets (Sunrace 11-speed cassette with SRAM chain) were so worn that the new chain just jumped and I would have had to replace everything.
With the SRAM GX cassette, however, I got a new rear wheel after about 8,000 kilometres, rebuilt the cassette, but accidentally fitted a new chain.
And I didn’t notice, because there was no jumping, no noise. It was only when I wondered about a much more worn chain on my workbench that I realised the mistake.
I believe that the assumption of having to replace the chain every thousand kilometres dates back to the grey prehistoric days of cycle touring. Back then – as I remember – it was always said that you should always take two or three spare chains with you on tours like the one I did from Germany to India, for example, or through the Sahara, so that you could change them every 1,500 kilometres and thus reduce wear and tear and increase the service life of the sprocket. To be honest, this was too expensive and too complicated for me (there were no chain locks yet) and so I rode the 15,000 kilometres to Mumbai/Bombay (or the 6,500 kilometres to Timbuktu) with a Shimano XT cassette and chain (with 3×8 or 3×9 gears). In the end, however, the gears were at the end of their tether and jumped from time to time.
Back to the Nordest: I’m currently still running a 12-speed 10-52 Garbaruk cassette with a SRAM GX chain. This combination was already in use at the Bohemian Border Bash Race and has around 5,000 kilometres under its belt. It will now go to the Salsa Fargo, where I will replace the GX cassette and chain combination described above.
By the way, I can highly recommend the Garbaruk cassette. Not only is it light, it also shifts very well. I have heard that there are sometimes problems with shifting performance. I cannot confirm this. But it is certainly more efficient, if you can believe this test by Zero Friction Cycling, which took a closer look at the efficiency of chains. (Thanks to Torsten Frank for the reading tip!).
But now the XX1/X01 cassette with an XX1 chain. I also assume a durability of at least 10,000km.
Bottom bracket and crank
I fitted a 170mm crank from Hope at the front, together with an oval 32t chainring. The crank has a 30mm shaft and therefore runs in a Hope BSA 30mm bottom bracket. As you can see, in red, as I chose this colour as an accent for my build, which I think goes well with the titanium.
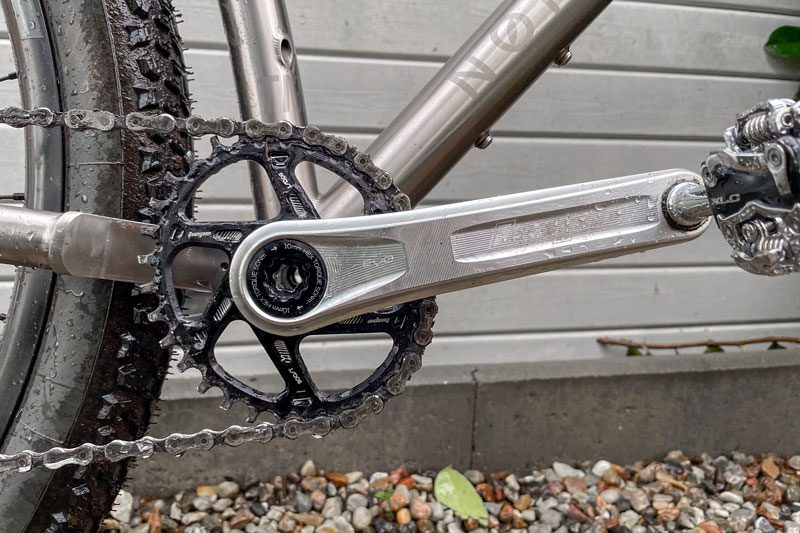
However, there was a nasty surprise with the Hope bottom bracket after just 80 kilometres: it simply broke.
But this should be an isolated case, because as far as I know Hope buys the bearings from Enduro, which are unquestionably among the best and most durable bearings you can have. I ride an Enduro MAXHit BSA 30 bottom bracket on my Salsa Fargo, which has a lifetime guarantee.

In the meantime I have also got a replacement and have now fitted a new Hope bottom bracket. However, the most important thing to learn here is that Hope requires an extra installation tool, as normal bearing spanners do not fit. This annoys me, as I’ve now added another dimension and the likelihood of finding a suitable tool on the road is very low. If the worst comes to the worst, I’ll have to use the good old pipe wrench.

The wheels & tyres
Like my Salsa, the Nordest Sardinha has Boost standard tyres. I was therefore able to use my new wheels built by Light-Wolf. These have a Beast XC30 carbon rim with a 30mm inner rim width. A DT-Swiss 240 hub is fitted at the rear, while a SON 28 provides power for my lights at the front.
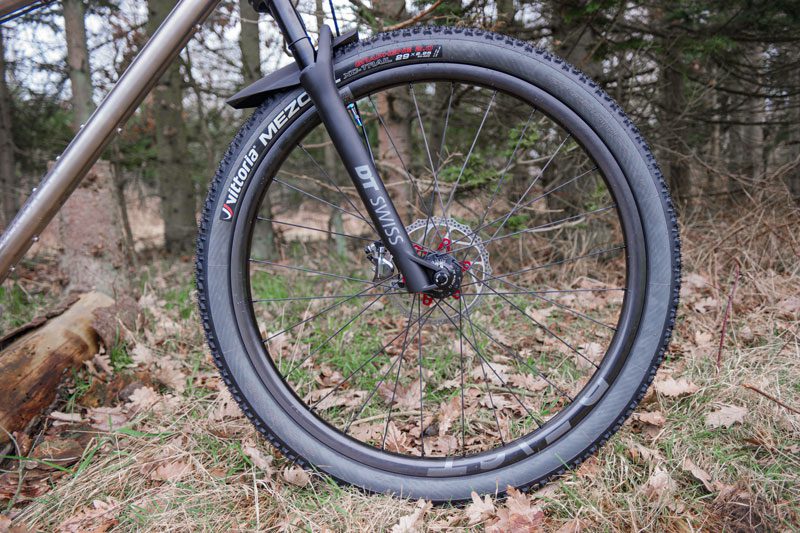
For the valves, I once again chose the Muc-Off valves in Rainbow. However, these clog up quite quickly and I have to clean them regularly. (I’ve even ordered a special valve cleaner!) Let’s see if I’ll replace them with normal Schwalbe valves, which haven’t clogged up yet.
For the tyres, I rely on my tried and tested Vittoria Mezcal with a width of 2.25 inches. They are very puncture-proof, roll well, are not too heavy and have good traction off-road. I have used them both in Morocco and in Kyrgyzstan and they are still my go-to tyres when it comes to MTB tyres.

I ride tubeless and currently use the Blue Dot sealant from Schwalbe. It has proved its worth for me.
The brakes
I thought a little longer about the brakes. Firstly, there was the question of whether to go for 4-piston or two. In the end, I decided in favour of 2-piston brakes, as these are usually completely sufficient. I ride 4-piston brakes from Hope on the Salsa, which are brute, but also somewhat heavier and wider.

That’s why I initially planned to use Shimano XT brakes. But then came the Christmas offers and I got myself a cheap set of Shimano XTR brakes in matching silver.

These are very easy to fit and maintain. After fitting them and shortening the cables, I bled them completely. Now they are crisp enough and have a nice pressure point. I had to replace the olive on the front brake because it was defective and leaking oil. You should always have olives on hand, as I discovered. And a suitable press-in tool for the end pin of a hydraulic line.

The brake discs were also supposed to come from Hope, but they wore out quite quickly on the Fargo. I therefore spontaneously decided to buy the 180 mm discs from Reverse Components. This is a two-piece disc with an aluminium spider and a steel disc. And at 105g per disc, they are not particularly heavy. They brake very well and hardly squeak at all (only when very wet and dirty).
Headset, stem & handlebars
I was able to practise on the Salsa Fargo and now on the Nordest Sardinha I was almost a pro at pressing in the headset. I opted for a Hope headset in red. Above, the headset upper part “2” S.H.I.S. ZS44/28.6. Below, the lower part “H” S.H.I.S. EC44/40.

I also stuck with the Brits for the stem and fitted the Hope stem 31.8 mm XC 0° with a length of 70 mm, albeit in black. Too much red would no longer set any accents.
I filled the fork above and below the stem with carbon spacers to give the whole thing a little more design. At the top, a red Hope cap completes the whole thing.

When it came to handlebars, I searched a little longer and then came across the Truvativ Atmos 7k thanks to a tip from Fabian Wurm. It has a rise of 20 mm and a backsweep of 9°. Above all, this aluminium handlebar has enough space at the stem mount to install aerobars. This was important to me as I don’t want to do without them in ultra races.

The handlebar also weighs only 250g with a width of 760mm. I opted for the Ergon GA3 grips, which I like very much so far. They are not too hard and the lip provides good hand guidance and support.
I also fitted the SQ Lab Innerbarends. These only weigh 56g, but are a very good support when it comes to alternative grip positions. I will ride them on the handlebars in addition to the Aerobar as they are so incredibly comfortable.

For the aerobar I have now chosen the Deda Parabolica Uno J-Bend. It weighs 350g and with its maximum 35cm long extensions offers enough space for long distances against the wind. I’m still trying out the correct position and width of the forearm supports. I also bought spacers for the Deda to make it a bit higher and therefore more comfortable for my riding position.

Saddle & seatpost
For the saddle, I opted for my old SQ-Lab 611 Ergowave. I had my sit bones measured again and then decided in favour of this saddle, which I had bought two years ago but which the first bike fitting had not recommended (but had sold me a new saddle).

And I have to say that after almost 350 kilometres I have absolutely no complaints. But that’s also down to the adjustment, which I took a little more time for.

For the seatpost, I also rely on an old friend: the Thomson Elite aluminium seatpost, which I also ride on the Fargo. Absolutely reliable and light.
The light
The light, however, is new: after having very good experiences with Klite on the Salsa, I wanted to try out the competition from America. Originally, I also had the Supernova M99 DY Pro in my shortlist, but unfortunately it is not compatible with USB chargers and therefore not an option for the kind of bikepacking and racing I want to do.

That’s why I bought the Sinewave Beacon 2.
It has a total of 3 LEDs with white light and a maximum luminous flux of 750 lumens and has an integrated USB charger.
The stand light lasts quite long at 5 minutes (similar to the Klite), but the Beacon 2 can be operated with a power pack if required (via an extra cable). This turns the Sinewave into a battery-powered lamp and provides a constant light on long uphill sections and in the dark. Theoretically, I can then recharge the power battery during the day via the USB charger on the Beacon 2.

Sinewave specifies very precisely how much power the lamp has and for how long with which power of a power battery. Bikepacking.com has extrapolated this:
A 10,000 mAh battery, for example, provides 10 hours of illumination at full brightness (750 lumens), and the runtime of the Beacon on a low setting is about four times as long and is around 40 hours (at 125 lumens).
Bikepacking.com
On the low setting, you can choose between a parking light and a flashing light when using the battery.
The Beacon 2 works almost flicker-free even at low speeds. The Sinewave has a total of three switching levels via a toggle switch on the rear: full light of all four diodes on (750 lumens), light off – USB charger running, “low brightness” light on and charger on. The latter is ideal as a daytime running light or when it’s getting dark but you don’t need to see anything yet.
As a rough guide at different speeds, you can assume that the Sinewave emits 100 lumens at approx. 8 km/h, 375 lumens at 13 km/h, 600 lumens at 16 km/h and 750 lumens at 21 km/h (sources: Bikepacking.com and Sinewave).
Added to this is the low weight of 115g. I mounted the Sinewave on my Aerobar (upside down – this is possible with the Sinewave as the LEDs are arranged symmetrically) and used the Supernova Universal HBM holder. There it sits at the front, provides good illumination and I can easily reach the toggle switch and operate the USB port.
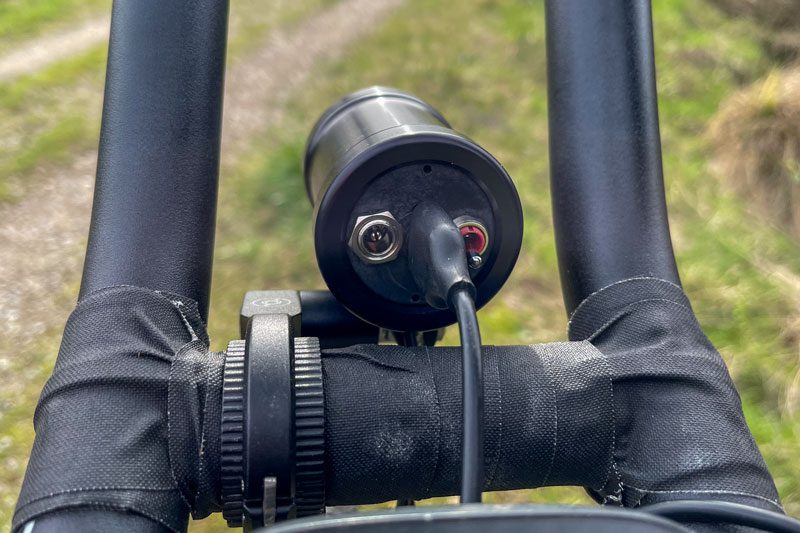
The Wahoo is mounted directly behind it, which is charged directly by the hub dynamo via the Beacon 2 using a micro USB cable.
The Sinewave Beacon 2 is not StVzo approved as it shines very brightly and widely. I therefore do not use it in road traffic and only use it off-road. To avoid dazzling oncoming traffic, I simply switch the light off when in doubt.
I do the same with the Klite, whose parking light gives me enough residual light so that I don’t have to ride past completely in the dark. In practice, however, this doesn’t happen often and I usually ride alone anyway.
If you like, you can also fit a rear light. The Sinewave has a cable for this, to which you can then connect a light.
I’ve decided against it for now, but I’m flirting with the Mü -E (” µ” ) dynamo LED rear light from Busch+Müller, which is very bright and quite small and light and would actually fit well.
The Sinewave light is of course weatherproof and the connectors on the back are also sealed against dirt and water.
Conclusion Nordest Sardinha 2 Ti
As I wrote above, I have rarely ridden such a comfortable and sporty bike. Everything fitted immediately and it’s fun to ride it not only off-road but also on normal roads. The propulsion and directional stability are remarkable and the geo is a nice mix of agility on the trail and comfort on the long haul. I would almost say: perfect!

The frame triangle offers me enough space and the numerous eyelets are designed for all types of racks. It’s a sports bike without luggage and a long-distance racer with a full load.
The total weight of the setup as described is 11kg.
So I will have a lot of fun with it on my next races and bikepacking events. And when it comes to travelling by bike again, the Nordest won’t go amiss either.

Do you have any questions about the Nordest Sardinha?